Neven’s Pan Pizza
Pan pizza is the best pizza you can make in a typical home oven. It’s also a style that’s tricky to find in restaurants (though it’s becoming more popular.) That means you should make it, and I’m here to help. This is my simple, flexible, delicious recipe.
(Before we begin, have you seen my thin-style pizza recipe? It’s a good idea to read it even if you’re here primarily for the pan pie.)
Neven’s Pan Pizza
Servings: one 9 x 13” (or 10 x 14”) pizza
Time: 3.5 hours (mix and proof) + 1 to 3 days (fridge-ferment) + 6 hours (final proof) + 25 to 40 minutes (shape, top, and bake)
INGREDIENTS:
- 175 g all-purpose flour
- 75 g high-gluten or bread flour (or all-purpose flour)
- 5 g (2%) salt
- 50 g (20%) ripe sourdough starter, fed and doubled and ready
- 200 g (80%) water
- ~2 tbsp olive oil
DIRECTIONS:
Put all the dry ingredients into the bowl of a stand mixer outfitted with the dough hook and stir with a spatula to combine. Add the starter and about 2/3 of the water. Start the mixer on low speed and mix for 1 minute; add the rest of the water, and mix for 4 more minutes. Switch to medium speed and mix for another 5 minutes. If at any point the dough threatens to crawl out of the bowl, stop the mixer and scrape the mess back down into the bowl. The dough will be wet and sticky—not to worry, that’s what 80% hydration looks like.
Scoop the dough out into a new bowl (wider, shallowe, preferably non-metal.) Cover the bowl with plastic wrap and let the dough rest in a warm spot for 3 hours. (70–74°F? An oven that was on for two minutes before being turned off is a good environment.) Every 30 minutes or so, fold the dough—just go around the edge of the dough with a flexible spatula and fold the outside in, like a scared starfish. You’re just trying to redistribute the dough to make it nice and smooth.
Grab a 9x13 nonstick sheet pan, with sides at least 1.5″ tall. (See below for a list of my preferred equipment.) Pour in 1.5 tbsp olive oil—about two glugs—and spread it around. (If your pan is truly nonstick, you don’t have to be thorough here; if it’s not, cover every damn millimeter with oil. Not a lot of oil, just complete coverage.) After the 3 hours have passed, move the dough into the pan. Gently scrape it into the middle of the pan, then flip the dough over so both sides are oiled. Flatten it just a tad and leave it alone. It won’t come close to filling the pan, and that’s ok. Now’s the time for it to go to sleep in the cold: cover your pan tightly and move it to a fridge shelf for 1-3 days.
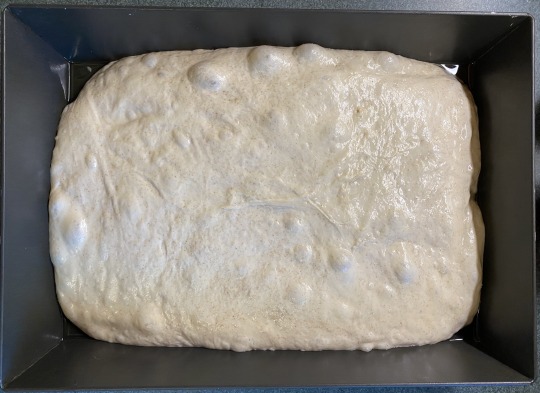
6 hours before baking, remove the pan from the fridge and set it on the counter. Feel free to sneak a peak at the dough: it looks about the same, yeah? Now watch it spread out and blow small bubbles in the coming hours, especially if you give it a nice, warm environment again.
Preheat your oven at 500ºF for at least half an hour, with your rack somewhere around the lower middle; all ovens vary, so adjust as needed after you see your finished pie’s top and bottom bakes.
To stretch the dough: uncover the pan and oil your fingers with the olive oil pooled in the corners. Now gently dimple the dough and watch for bubbles—cool, yeah? Spread it softly from the middle, grabbing the dough corners and lifting them into the pan corners if needed. Your dough will be very soft and may seem uneven, but don’t sweat it; just patch any holes without massaging the dough too much.
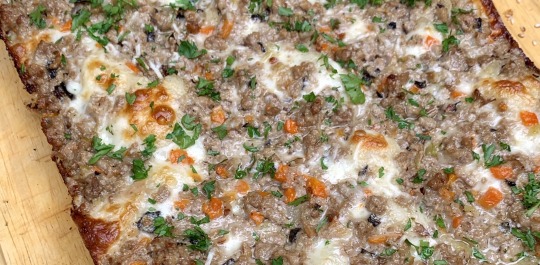
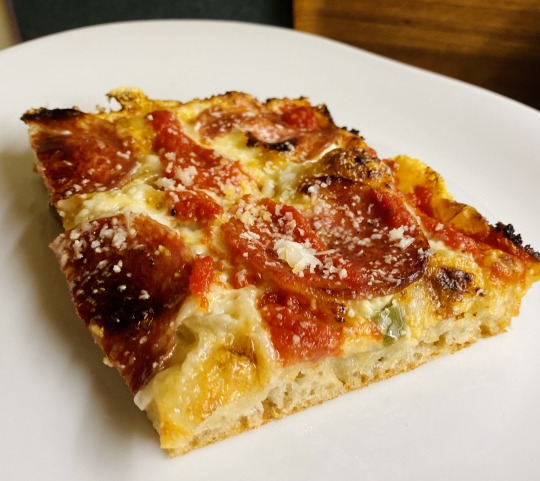
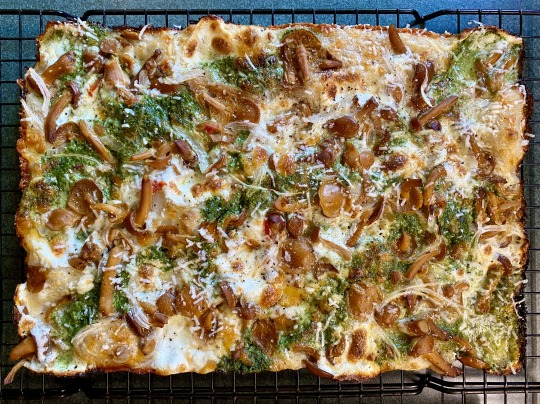
Topping time! Please place on your pizza whatever you like. Pan pies generally work better with cheese on the bottom. Also, try not to overtop it because that fluffy, fluffy dough needs to be able to rise—too much weight on top will prevent it from doing so. Remember that you can add a lot of stuff after baking—including tomato sauce!
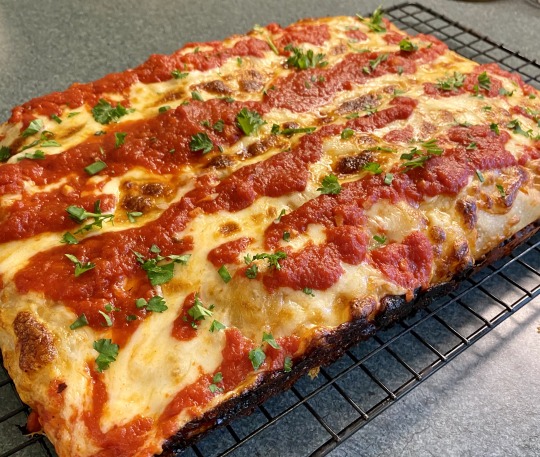
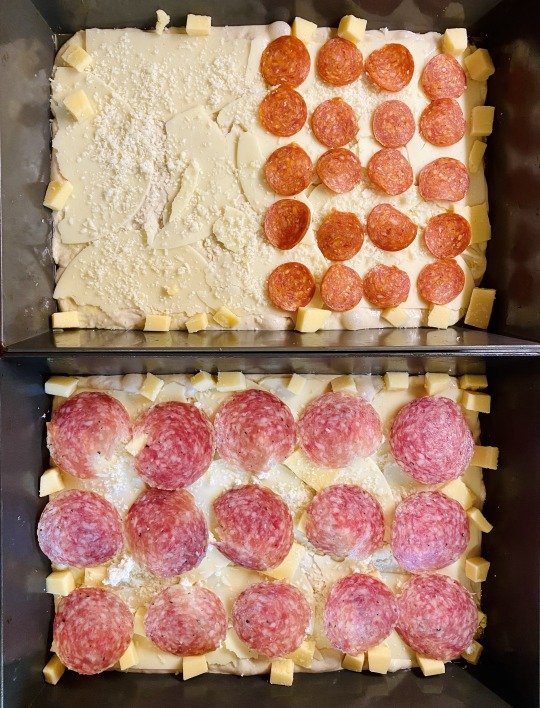
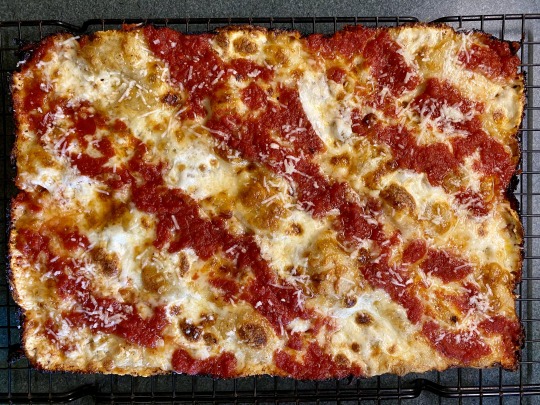
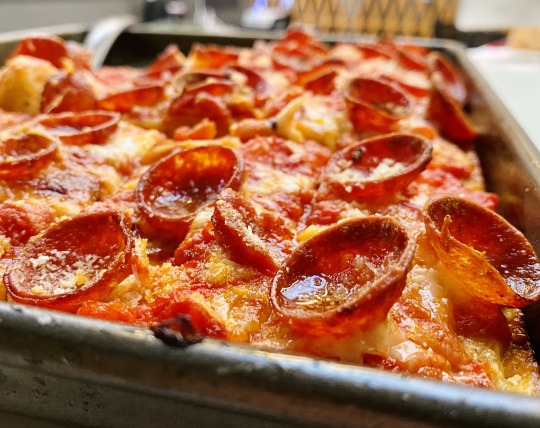
So, line the dough with cheese. My preference is to use sliced mozzarella or provolone, though shredded or cubed will also work. Add extra cheese into the corners of the pan, so it bakes up into an irresistible cheese crust. Spoon cooked tomato sauce on top (in a hip diagonal pattern if you want to look fashionable on Instagram) and add any other toppings.
Bake for 12-16 minutes, rotating half way through. Watch the pie carefully in the last few minutes. Oh, did I mention—crank your vent hood because the cheese will burn and smoke, beautifully so.
When your pizza looks good enough to elope and start a new life in Mexico with, pull it out using decent oven mitts. Give it a minute to come to its senses, then go around the rim with a thin, non-scratchy tool—like a plastic knife or a small spatula—to release the cheese and sauce from the pan. It shouldn’t be much of a struggle if you used a good pan. Now dexterously slip an offset spatula or a burger flipper under one (narrow) side of the pizza and transfer it to a cooling rack.
If you’re feeling particularly naughty, shower the finished pie with finely grated parmesan cheese. I won’t tell anyone.
Give your pizza 5 minutes to rest—ok, ok, you have my permission to cut it after 2 minutes. Move to a cutting board and have at it with a large, sharp knife.
- - - END OF RECIPE - - -
- - - ADDITIONAL INFORMATION AND ANECDOTES BELOW - - -
Just a reminder that my thin-style pizza recipe has more info about technique and ingredients and such, and I’m not going to repeat it all here like an aging musician running out of inspiration and covering their heyday hits to pander to the old fans.
Questions? Comments?
I don’t even have a sourdough, man.

It’s like, month three of quarantine—what have you been doing with your time?
Alright, alright.
Neven’s Pan Pizza for Non-sourdough Folks Who Nevertheless Deserve Our Love and Respect
Servings: one 9 x 13 (or 10 x 14) pizza
Time: 3.5 hours (mix and proof) + 1 day (fridge-ferment) + 2 hours (final proof) + 25 to 40 minutes (shape, top, and bake)
INGREDIENTS:
- 175 g all-purpose flour
- 75 g high-gluten or bread flour (or all-purpose flour)
- 5 g (2%) salt
- 3 g (~1%) instant yeast (half a package thingy)
- 200 g (80%) water
DIRECTIONS:
Stir all the dry ingredients well in a large bowl, then add the yeast and water and stir again, using a silicone or wood spatula. When it starts coming together, pour in the olive oil and work it in. No need to get it smooth; just mix until there’s no dry flour on the bottom. Cover tightly with plastic wrap.
Every 30 minutes in the next 2 hours, fold it: slide the spatula under one side and fold it over toward the middle. Do 4-6 folds like this in one session. No need to be picky about the 30-minute timing, just shoot for 2-4 fold sessions in the first few hours of proofing, to distribute everything well.
Cover and leave out at room temperature for 12-18 hours. Just go to bed, don’t worry about it. You’ve worked hard all day.
The next day, the dough should look huge and bubbly. Does it? Oh, good. Now proceed with the above recipe from the pan-oiling step: move it to a pan, give it 1-2 hours to relax, stretch it, etc.
But I don’t have a stand mixer.

(I couldn’t find a gif of Donald Pleasance in Wake in Fright (1971) so this still image will have to do.)
Look, it’s fine. Read the above no-sourdough steps. No mixer needed. You can just do that, even when using sourdough—maybe halve the amount of sourdough starter. (It’s potent stuff.)
And now, a chaser for that hot hot image above.
Shop Talk
My attorneys have advised me to disclose that the links below include my referral code, which will make me even filthier rich than I am currently. (How rich am I? I make my own pizza, that’s how rich.)
- LloydPans Detroit Style Pizza Pan. These are just tremendous—wonderfully made, perfectly nonstick, stackable. Ideal for pan pizza, focaccia, and many other bakes.
- Detroit Style Pizza Pan Lid. Not at all required, but if you get serious about this pan pizza business, the lids are great because they’re reusable and they let you stack several pans in the fridge. (Note that you can bake two of these pizzas side by side in a typical oven. That’s what I do. Yes, it’s because I eat one whole pizza myself.)
- Cooling rack. I can’t stress enough the importance of cooling and resting your pizza—thin or thick, before it’s had a chance to release all that steam, it’s still kind of a wet mess of a casserole.
The End
I realize some folks still think that thin vs. thick is an interesting pizza debate to be having in the 2020s, but I hope they can move on and get into all the pizza styles out there. Pan pies are so good. See for yourself.