Pizza romana / pizza al taglio / thin pan pizza
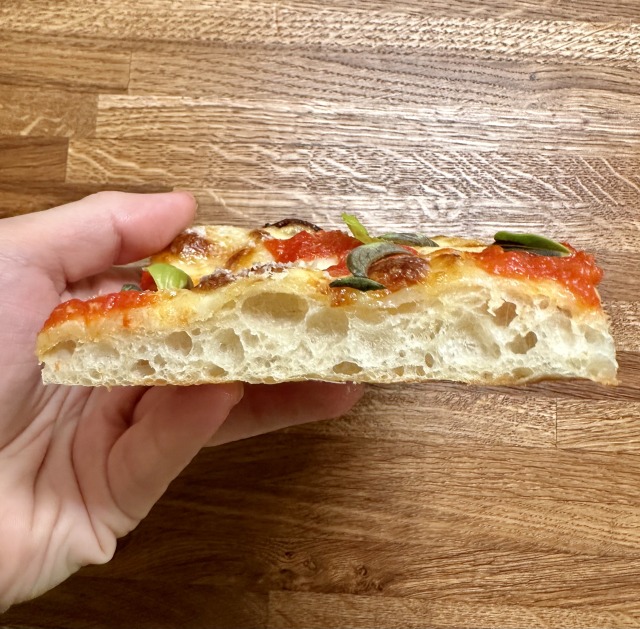
Sometimes you feel like a pillowy, bready pan pie, something you could slice into flavorful bread sticks. Other times, you want a large, soft pizza where the toppings shine more. This is one of those: an easy, no-knead, no-sweat base for endless pizza variations. Try topping it before baking, but also after—it’s an edible board, and much more.
Neven’s thin pan pizza
Servings: two 10 × 14" pans (9 × 13" will also work)
Time: 10 min mix + 8-12 hour proof + 5 minute shape + 3-6 hour proof + 15 minute cook
INGREDIENTS:
- 300 g all-purpose flour
- 200 g high-gluten flour (or more APF)
- 10 g salt
- 365 g water
- 50 g ripe-and-ready sourdough starter (yeast variation below)
- 20 g olive oil
DIRECTIONS:
The night before you intend to eat the pizza, do the following:
In a very large nonreactive bowl (meaning, stainless steel, glass, or plastic, but not aluminum) add the flours and the salt, and stir together. Pour the water into the middle, then add the starter to it. Using a large spatula, stir and fold the whole mess for a bit; then add the olive oil. Stir and fold some more, until it becomes a basically coherent mass and there’s not a huge pool of dry flour at the bottom of the bowl. This should only take a minute; you’re not trying to knead dough, you’re just making the shaggy ball a little uniform.
Cover well and rest for 30 minutes to an hour. Come back to it and, using the spatula or a flexible scraper, fold the ball on itself from each side, just to bring it together a bit more. Note that it will already look smoother and more dough-like, though it’ll still be rather lumpy and homely.
Cover again and rest on the counter or in another room-temperature place (between 65ºF and 75ºF) overnight, for 8-12 hours. Hot days in humid climates will take less time, and a cold winter’s night might take as long as 16 hours. What you’re looking for at the end of this process is a dough that’s much larger than it started, light and inflated-looking, with possible surface bubbles. (If it has collapsed into the middle, then it’s been overproofed; this is unlikely to happen. If it’s still a dry lump, then it never proofed at all; perhaps your yeast is too old, or your room is super cold? Sorry!)
Now grab two 10 × 14" pans (9 × 13 will also work) and grease the bottoms with a small amount of butter. Even coverage matters more than opulence, so make sure it’s not a thick layer of goop. We’re using butter rather than oil here because it’ll stop the dough from pulling back into the center of the pan.
Flour your workbench (counter or large cutting board) liberally.
Using a flexible scraper, scrape around the edge of the bowl, then pop the dough into the middle of the workbench. Cut it in half; you can eyeball this, or measure each half to ~470 g. Place one half back in the bowl.
Working gently—without crushing the dough—first flip your dough over to flour both sides of it. Now start stretching it into a rectangle about 6 x 10" in size. No need to get it perfect; just get as close as you can while keeping the dough thickness even all around. I like to reach under the sides and pull out with my fingers. You may need to flip the whole rectangle over if any of it threatens to stick to the bench. You’ll want to be able to lift the whole thing easily.
Once you have it close to 2/3 the size of the pan, transfer the dough to the middle of it. Reaching under once more, stretch the sides to the edges of the pan. Dimple any thick areas of dough from above to softly push them to the side.
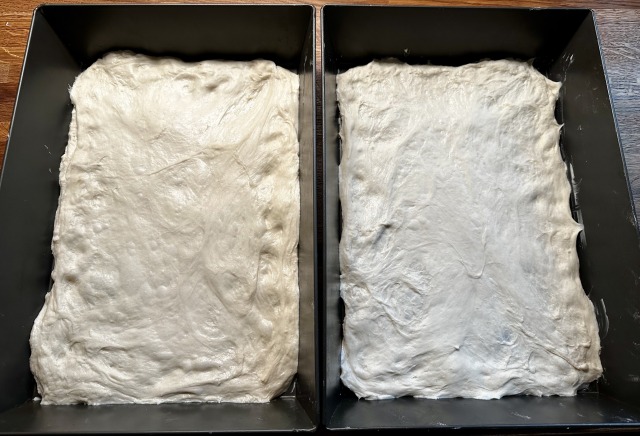
Repeat with the second half of the dough.
Cover again. Give this second proof 3–6 hours, depending on your room’s climate. When it’s ready, the dough should be slightly puffy.
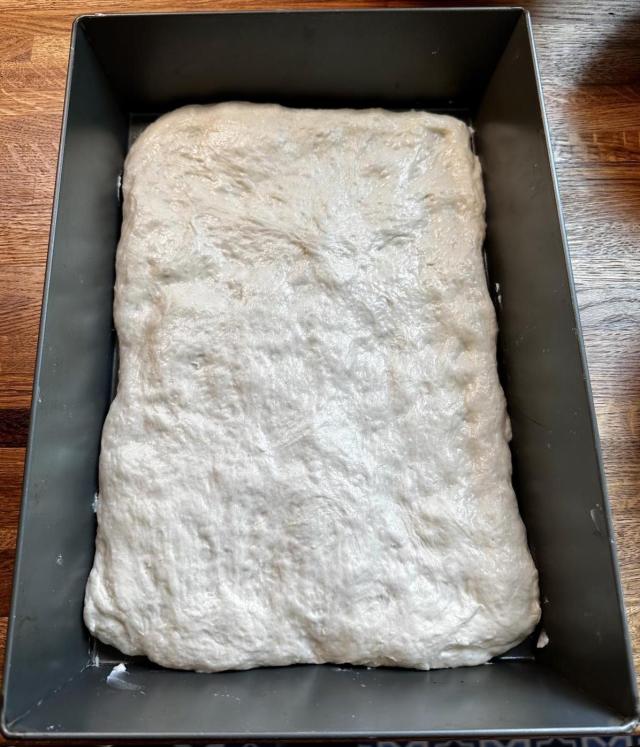
From this point on, you can perhaps dimple any super-fluffy areas, but don’t stretch again.
During the last 40 minutes or so of this proofing time, preheat your oven to 515ºF. Move one of the racks to the bottom third of the oven.
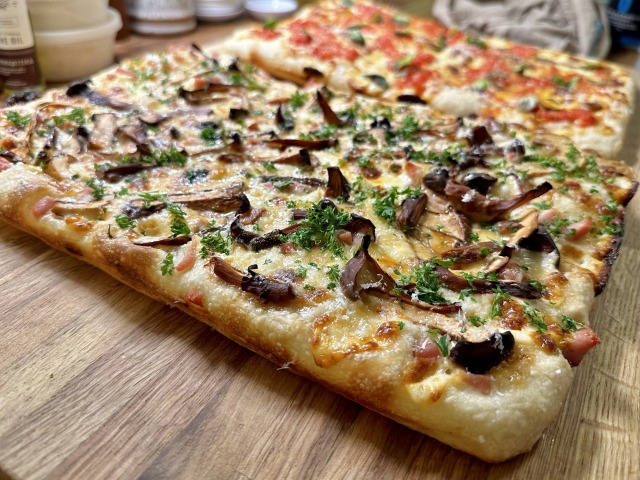
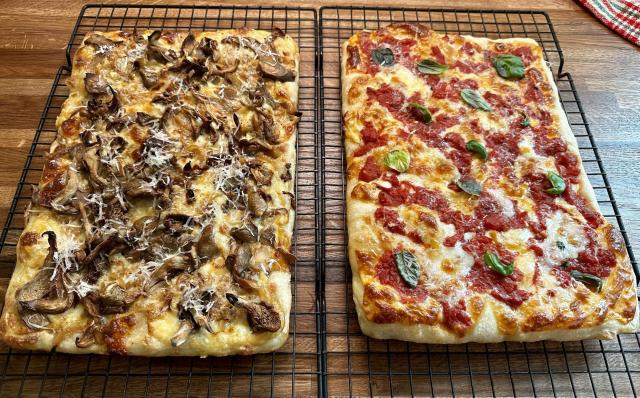
Top however you’d like. For a classic cheesy-marg type of thing, I would cover with sliced, shaved, or shredded aged mozzarella, then dab with tomato sauce on top. Don’t forget to season with salt, and hit with a bit of olive oil.
If you’re using other toppings, remember that the sides of the pan will get hotter than the middle, so place the larger toppings around the perimeter.
Bake on the bottom-third rack of the oven for 12–15 minutes, rotating halfway. Move the whole pan to a cooling rack for 2 minutes, then slide the pizza out with a large spatula or flipper onto the rack.
Top with any post-bake toppings: basil, shaved parmesan, sauce drizzles. Cool for 5 minutes before moving to a cutting board and slicing.
YOU SAID THERE’D BE A YEAST VERSION
If you’re not a Sourdough Person, this is easily made with commercial yeast as well. Please make sure to use good instant yeast and store it in the fridge/freezer to prolong its shelf life; it can be used cold.
The only change you’d make is replacing the 50 g of sourdough starter with ¼ tsp of yeast. Add it after you’ve stirred the flours and the salt together, before you add the water.
This means that your dough will be 50 g lighter than the above recipe. That’s not an enormous difference, but you could always make it up with another 25 g each of flour and water.
The rest of the recipe should proceed the same way, including times and temperatures.
You can also scale this recipe however you’d like—making a single pan won’t be much different.