Sourdough English Muffins
If you’re going to have a sandwich for breakfast, your best bread option is an English Muffin. If you’re going to buy those, your best choice is Bays brand. But if you’re a Sourdough Person, you can make the best Anglo Muffs of your life at home.
This recipe should be super chill for anyone who has baked sourdough before. It’s largely based on the method employed by The Model Bakery. We’re gonna be frying these buns.
Neven’s Sourdough English Muffins
Servings: 12
Time: 15 min mix + 6 hour proof + 10 minute shape + overnight proof + 20 minute cook
INGREDIENTS:
- 400 g all-purpose flour
- 100 g high-gluten flour (or more APF)
- 10 g salt
- 300 g water
- 135 g ripe-and-ready sourdough starter
- 18 g olive oil
- ~¼ cup semolina, or medium-coarse cornmeal
- 6 tbsp clarified butter (ghee), or plain butter
DIRECTIONS:
In the bowl of your stand mixer, stir together the flours and the salt. Add the water, the starter, and the olive oil. Attach the bowl to the mixer equipped with the dough hook attachment. Start the mixer on the lowest speed and mix for 3 minutes, then stop and scrape down the sides, releasing the dough ball from the dough hook. Kick up the speed to the next notch and mix for another 3 minutes. Stop, scrape, and increase the speed by 1 again; mix another 3-4 minutes, until the dough is smooth.
Transfer the dough to another, lightly oiled bowl (I like a wider, shallower container for this) and cover. Leave on the counter for 4-6 hours; it will need less time on a very hot day, more on a cold one.
Once the dough looks smoothly inflated—note that it may not double in size—flour a workbench. Grab a half-sheet pan (18″ x 13″) and lay a piece of parchment paper on it, then generously and uniformly dust it with semolina or cornmeal.
The dough should be light and gassy, so handle it gently and use flour as needed. With a bench scraper or knife, cut it intos dozen ~80 g pieces. Shape each into a ball by pulling the sides towards the middle and pinching together, then flip it over and roll on the bench to form a smooth top and a bottom sealed together by rolling. Place these balls on the dusted half-sheet pan, spacing them evenly; they will grow somewhat during their second proof. Cover carefully with a large proofing bag or plastic wrap.
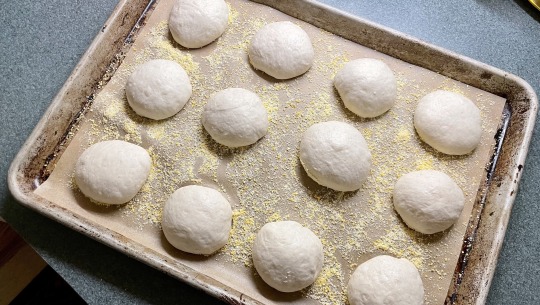
Proof overnight (12-18 hours) in a cool place—either the fridge, or something like a basement/garage if it gets no warmer than 55ºF.
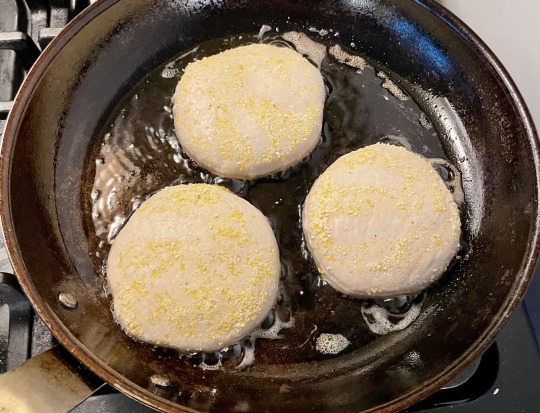
In the morning, we’re going to “fry” the English muffins. You’ll want to use a large cooking surface—either a griddle that will hold ¼" of melted clarified butter, or one or more cast-iron skillets. I used two 12" cast-iron skillets. Heat them up for a few minutes over medium-low-to-medium heat.
Melt the clarified butter; this will happen quickly. Now pick up your muffins very gently and flip them into the oil with the un-dusted, top side down; you’ll fit 3-4 per skillet. Cook for 3-4 minutes, then flip and do another 3-4 minutes. Look for beautiful browning, but without burning; adjust the heat if needed. Also remember to rotate the skillet occasionally to avoid hot spots.
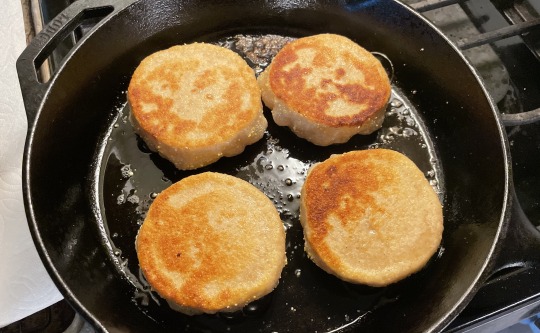
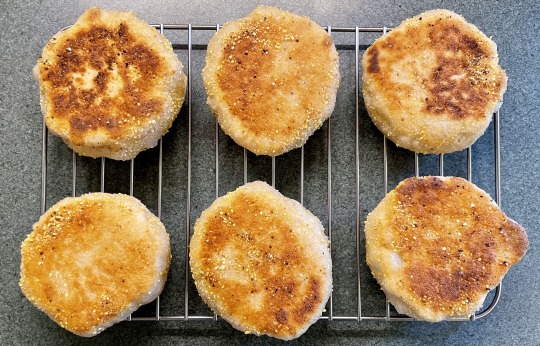
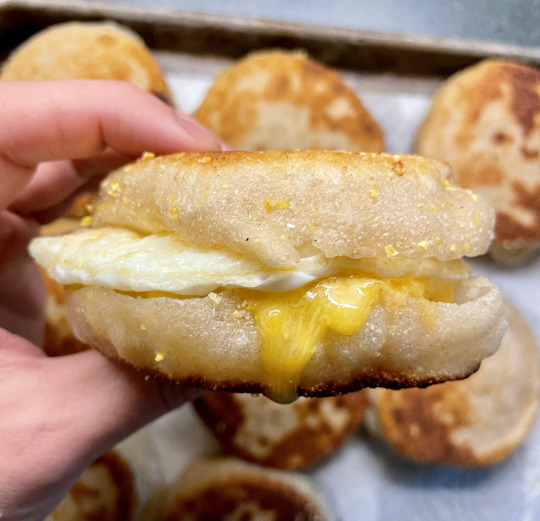
When cooked, move the muffins to a cooling rack lined with paper towels. Rest for at least 20 minutes. Split with a knife and toast the inside if you’d like. Make into a sandwich, top with jam, or eat as-is. Store in a sealed container, and freeze after 1-2 days if any are left over.
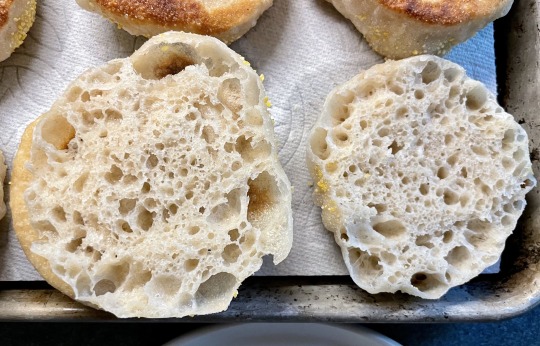
Notes on ingredients and technique are discussed below these two braggy pictures. Yeah, I eat English Muffin sandwiches!
JUST A FEW QUICK SUGGESTIONS AND OBSERVATIONS, IF YOU HAPPEN TO HAVE A MINUTE
What’s a clarified butter?
Clarified butter is butter with its milk solids and water removed—so what’s left is just the fat part of it. It lasts longer and won’t burn as easily in the pan. To make it, you can just melt a stick or two of butter over low heat, then scoop off the floating milk solids and discard any watery stuff left at the bottom.
I’m sorry, I thought we were making English Muffins, not doing chemistry!
Yeah, well. You’re totally welcome to fry these in regular butter, but watch out for burns. Maybe turn down the temp and cook for longer.
I’m supposed to split these with a fork, not a knife, right?
No.
Are you sure?
Yes.
I’m pretty sure everyone says to split your English Muffins with a fork, NOT a knife.
People say a lot of things.
It’s how you get the nooks and crannies!
Oh here we go with the nooks and crannies…
Those are the best part of the muff!
I think we’re done here.
Nooks. Crannies. Hello!
Thank you, please leave now.
Who the hell splits things with a knife??
(yelling through the closed door) It’s what knives were invented for! Cutting things!
(crowd dressed up as Nooks and Crannies picketing outside my house) NOOKS AND CRANNIES! NOOKS AND CRANNIES!
Fine! Use a spoon! Use a cheese grater to “cut” your English Muffin! Put them in the dishwasher! Pickle them, for all I care.
Do you have a recipe for these based on commercial yeast rather than sourdough?
Not right now, sorry.